How To Map Extra Buttons On A Logitech G502 For Excel
Excel power users know that speed and accuracy often hinge on how quickly you can execute commands. The Logitech G502 gaming mouse offers up to seven programmable buttons, giving you the chance to streamline repetitive tasks, navigate worksheets, and trigger macros without leaving the keyboard. This guide walks you through the complete process of mapping those extra buttons specifically for Microsoft Excel, from software setup to fine‑tuning your workflow.
Why Use a Gaming Mouse for Excel?
While a keyboard is the traditional tool for spreadsheet work, a mouse with programmable buttons can:
- Reduce hand movement – Assign navigation commands (e.g., Ctrl + Arrow) to side buttons.
- Speed up repetitive actions – Map macro‑driven functions such as “Insert Row” or “Auto‑Sum”.
- Free up keyboard shortcuts – Keep common shortcuts available for other tasks.
Because the G502’s buttons are fully customizable via Logitech G HUB, you can tailor each click to match the exact Excel commands you use most often.
Preparing Your System
1. Install Logitech G HUB
- Visit the official Logitech website and download the latest version of Logitech G HUB.
- Run the installer and follow the on‑screen prompts.
- Connect your G502 via a USB port; the software should detect the device automatically.
2. Update Firmware
Before you begin mapping, ensure the mouse firmware is up to date. In G HUB, click the Firmware tab and apply any available updates. This step prevents compatibility issues with newer Windows or Office builds.
Mapping Extra Buttons for Excel
Step‑by‑Step Configuration
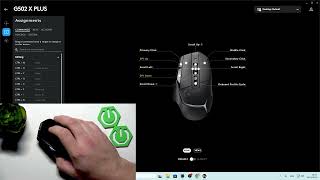
- Select the G502 profile – In G HUB, click the mouse icon, then choose Profiles & Settings. Create a new profile named “Excel” and set it to launch automatically when Excel starts.
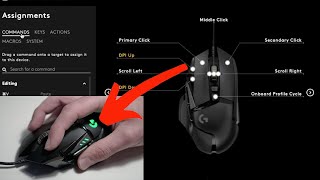
- Choose a button to edit – Click any of the side or thumb buttons (Button 4, 5, 6, 7, or the DPI switch) to open the assignment window.
- Assign a keystroke – From the left‑hand menu, select Keystroke Assignment. Enter the exact shortcut you want, such as Ctrl+Shift+L for “Toggle Filters” or Alt+H, O, I for “Auto‑Fit Column Width”.
- Save the assignment – Click Save. The button now displays the assigned shortcut in the visual map.
- Repeat for other buttons