How To Repair Laptop Keyboard Keys
Laptop keyboards can develop issues over time, with keys becoming sticky, unresponsive, or even falling off. While professional repair services are available, many users can perform basic keyboard repairs themselves. This guide will walk you through the process of repairing laptop keyboard keys.
Tools and Materials Needed
Before you begin, gather the following tools and materials:
- A small Phillips head screwdriver
- Isopropyl alcohol (rubbing alcohol)
- Compressed air (optional, for cleaning)
- Replacement keyboard keys (if needed)
- Soft cloth or microfiber cloth
Step 1: Disassemble the Laptop
Turn off your laptop and unplug it from the power source. Remove any attached accessories, such as a mouse or external keyboard. Locate the screws on the bottom of the laptop and use a Phillips head screwdriver to remove them. Be gentle to avoid damaging the laptop.
Once the screws are removed, carefully lift the bottom cover of the laptop. You may need to gently pry it open with a flathead screwdriver if it doesn't come off easily. Set the bottom cover aside in a safe place.
Step 2: Remove the Keyboard
Locate the screws securing the keyboard to the laptop's frame. Remove these screws using a Phillips head screwdriver. Once the screws are removed, carefully lift the keyboard out of the laptop. You may need to gently pry it up with a flathead screwdriver if it doesn't come out easily.
Step 3: Clean the Keyboard
Use a soft cloth or microfiber cloth to gently clean the keyboard. Pay special attention to the keys that are not responding or are sticky. If the keyboard is particularly dirty, you can use isopropyl alcohol to clean it. However, be cautious not to spill any liquid inside the laptop.
If you have compressed air, you can use it to blow out any debris from between the keys. Be careful not to blow too hard, as this could damage the keyboard.
Step 4: Inspect the Keyboard Keys
Carefully inspect each key to determine the issue. If a key is sticky, it may be due to dirt or debris getting stuck underneath. If a key is unresponsive, it may be due to a loose connection or a broken switch.
Step 5: Repair or Replace the Keys
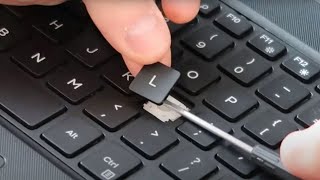
If a key is sticky, you can try to clean it again with isopropyl alcohol. If that doesn't work, you may need to replace the key. To replace a key, carefully remove the old key and insert the new one. Make sure the new key is properly aligned and secured.
If a key is unresponsive, you may need to replace the key switch. This process can be more complex and may require some soldering skills. If you're not comfortable with soldering, it's best to leave this task to a professional.
Step 6: Reassemble the Laptop
Once you've repaired or replaced the necessary keys, carefully place the keyboard back into the laptop. Make sure it's properly aligned and secured. Replace the screws that were removed in Step 2.
Next, carefully place the bottom cover back onto the laptop. Make sure it's properly aligned and secured. Replace the screws that were removed in Step 1.
Step 7: Test the Keyboard
Turn on your laptop and test the keyboard to ensure that the keys are working properly. If any keys are still not responding, you may need to repeat the repair process or seek professional help.
Conclusion
Repairing laptop keyboard keys can be a straightforward process if you have the right tools and materials. By following these steps, you can save money and time by performing the repair yourself. However, if you're not comfortable with the process or if the issue is more complex, it's best to seek professional help.


![ASUS TUF Gaming F15 dead keys EASY REPAIR [ solved ]](https://i.ytimg.com/vi/Su_TmJjbKY0/mqdefault.jpg)