How To Replace The Thermal Paste On A Ps4 Slim Safely
Curated coverage and comprehensive guides by Research Desk.
How to Replace the Thermal Paste on a PS4 Slim Safely
The PS4 Slim is a popular gaming console known for its sleek design and impressive performance. However, like any electronic device, it can be prone to overheating, which can lead to reduced performance, shutdowns, and even damage to the internal components. One of the most effective ways to prevent overheating is to replace the thermal paste on the PS4 Slim's CPU and GPU. In this article, we'll guide you through the process of replacing the thermal paste on your PS4 Slim safely.
Why Replace the Thermal Paste?
The thermal paste on your PS4 Slim's CPU and GPU helps to dissipate heat away from these critical components. Over time, the thermal paste can dry out, reducing its effectiveness and leading to increased temperatures. Replacing the thermal paste can help to:
* Reduce temperatures: By applying new thermal paste, you can ensure that heat is dissipated efficiently, reducing the risk of overheating.
* Improve performance: Lower temperatures can lead to improved performance, as the console can operate within a safe temperature range.
* Extend lifespan: By reducing the risk of overheating, you can help to extend the lifespan of your PS4 Slim.
Preparation is Key
Before you start replacing the thermal paste, make sure you have the following:
* A Phillips screwdriver
* A Torx screwdriver (for some models)
* A can of compressed air
* Thermal paste ( Arctic Silver 5 or equivalent)
* Thermal tape (optional)
* A clean, flat surface to work on
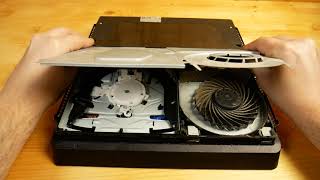
Disassembling the PS4 Slim
To access the CPU and GPU, you'll need to disassemble the PS4 Slim. Follow these steps:
1. Unplug the power cord and any other cables from the back of the console.
2. Remove the hard drive by pulling it out of its slot.
3. Use a Phillips screwdriver to remove the screws from the bottom of the console.
4. Carefully pry open the console's casing, taking care not to damage any of the internal components.
Locating the CPU and GPU
Once you've disassembled the PS4 Slim, locate the CPU and GPU:
* The CPU is located on the motherboard, near the center of the console.
* The GPU is located on the same motherboard, near the CPU.
Removing the Old Thermal Paste
Use a can of compressed air to remove any dust or debris from the CPU and GPU. Then, use a lint-free cloth or a cotton swab to gently remove the old thermal paste from the CPU and GPU. Be careful not to touch the components with your bare hands, as the oils from your skin can interfere with the new thermal paste.
Applying the New Thermal Paste
Apply a small amount of thermal paste to the center of the CPU and GPU. Use a credit card or a similar tool to spread the paste evenly across the surface of the components.
* **CPU:** Apply a small pea-sized amount of thermal paste to the center of the CPU.
* **GPU:** Apply a small pea-sized amount of thermal paste to the center of the GPU.
Reassembling the PS4 Slim
Once you've applied the new thermal paste, reassemble the PS4 Slim in the reverse order that you disassembled it:
1. Reattach the motherboard and other internal components.
2. Replace the screws and reattach the casing.
3. Reconnect the hard drive and any other cables.
Testing the PS4 Slim
Turn on the PS4 Slim and run a stress test, such as a game or a benchmarking tool, to ensure that the console is operating within a safe temperature range.
Tips and Precautions
* Always unplug the power cord and any other cables before disassembling the console.
* Use an anti-static wrist strap or mat to prevent damage to the internal components.
* Handle the components with care, as they can be fragile and sensitive to static electricity.
* Make sure the thermal paste is applied evenly and in the correct amount.
By following these steps and taking the necessary precautions, you can safely replace the thermal paste on your PS4 Slim and help to prevent overheating.
Related Coverage
PS4 Slim- Disassembling, Cleaning, Thermal Paste And Thermal Pads Replacement
I've been using my
PS4 Slim Disassembly: Fix Overheating with Fan Cleaning & Thermal Paste Replacement